Posts Tagged ‘solo’

Field of Battle 2 Random Scenario

August 17, 2013
FOB 2cover
FOB 2cover, a photo by The Gonk on Flickr.

The year is 1807. The Prussians have been humiliated, and the late arriving Russian Army, now under Bennigsen, is trying to surprise the French in a sweeping movement through Prussia.

In the van is Major General Barclay de Tommey (Tom G.), leading his corps on the Prussian town of Morunnin, where Marshal Francois Dalé’s (K. Dale) French corps is assembling to halt the Russian advance.


De Tommey’s plan relied on Flexibility in the face of a wily French foe– he prioritized his ability to Tactically Adjust over all else. Next would be ensuring that he could arrive with more force than his opponent. What few light troops he could spare would be used for Recon, although of course he knew exactly where the French were. And he gave little thought to his Deployment– they were catching the French unawares, and the battle would unfold in his favor no matter how he formed up.

Dalé’s plans were largely the opposite. His Deployment would no doubt be the key to his success, as he hurriedly formed up defensive positions around Morunnin. His Hussars and Chasseurs à Cheval were tasked with shadowing de Tommey and providing information about his troops’ dispositions. No doubt his defensive posture would compensate for the Strength advantage the Russians would have. And there was little thought to Tactical Adjustment once the battle was begun– Dalé would be the rock the Russian wave would crash apart upon.

But, of course, nothing ever goes according to plan.

De Tommey was forced to deploy from march sooner than he had hoped due to French outposts, which hampered his ability to Adjust Tactically. Those outposts then withdrew, leaving him unsatisfied with his Deployment. And he had yet to receive maps from his Prussian allies, and his inadequate Russian maps hampered what Recon he tried.

Dalé had his own problems. His well-intentioned Recon plans were largely thwarted by incompetent planing by his staff, and the suddenness of the Russian arrival. Worse, his outposts had withdrawn in the face of the Russian advance, further disadvantaging his Deployment!

In the end, the Recon and Deployment problems on both forces offset each other. However, the confusion around the disappearing French outposts left one of de Tommey’s brigades in a poor position for the battle. And while the French Recon had been largely unimpressive, the information brought back by the withdrawing outposts providing Dalé and his staff all the information they needed about the Russian deployment!


This is from FoB2’s random scenario generator. Here’s the background of how it was developed.

The setup resolves around four areas of competition between the two forces: Reconnaissance, Strength, Tactical Adjustment and Deployment.

Each force prioritizes those four areas, and gets an appropriate dice based on their C-in-C’s leadership dice. For this, I rated by C-in-C’s as Average, or d10. This gives them a d10, d10, d8 and d6 in each area, based on their priorities.

Tom’s priority order was Tactical Adjustment (d10), Strength (d10), Recon (d8), and Deployment (d6).

I couldn’t get in touch with K. (sorry for the late notice!), so I simply reversed Tom’s priorities: Deployment (d10), Recon (d10), Strength (d8) and Tactical Adjustment (d6).

Next, each side gets three Fate rolls. These are simple one word descriptions of something out of the C-in-C’s hands that modifies the four areas.

For the Russians, I rolled: Deployment -1 due to “Withdraw,” Tactical Adjust -1 due to “Outposts,” and Recon -1 for “Bad Maps.”

For the French, I rolled: Recon -2 for “Enemy in Central Position” and “Poor Staff Planning,” and Deployment -1 for “Withdraw.”

This left the following to roll off and get a result:

Tactical Adjustment: Tom’s d8 vs. K.’s d6, result 3 to 5, since <= 2, no advantage.

Strength: Tom’s d10 vs. K.’s d8, result 4 to 7, 1 level advantage to French

Reconnaissance: Tom’s d6 vs. K.’s d6, 3 to 1, no advantage

Deployment: Tom’s d4 vs. K.’s d8, 1 to 6, 2 level advantage to the French

The end result is that one Russian division will be late to the table, and the French will be able to redeploy two units during set up based on what the Russian deployment looks like.

Throw in a bit of the Battle of Mohrungen, and you got yourself a game, baby!

Joey…you like blog posts about Gladiators?

August 14, 2013
2013-08-11 18.44.55
2013-08-11 18.44.55, a photo by The Gonk on Flickr.

So I picked up a bunch of Crusader Gladiators at Historicon 2012– woof, no, make that 2011!! Wow, how time flies, I swear I thought these hadn’t been sitting around that long. Anyway, over the years, I also grabbed a few different rules to try out with Number One Son, who– at twelve– knows more Roman history than I do. I finally got around to painting up enough gladiators to play some games, as well as a few animals. And Number One Son and I sat down and finally played our first game!

The Crusader packs tend to come with four gladiators per pack– so I actually wound up with quite a few gladiators! I didn’t want to paint them all, so I just grabbed one of several of the primary fighting sytles:

2013-08-13 23.32.14

Hoplomachus, Thraex, and Murmillo— believed to be stylized versions of the fighting styles of the Greek Hoplite, the Thracians, and possibly Gauls or even the Roman legionary.

2013-08-13 23.31.38

The Secutor and the iconic Retiarius— two later styles without apparent historical precedent, but a very popular match up.

2013-08-13 23.32.31

2013-08-13 23.32.49

Men killing men gets old after a while– let’s mix it up with some cinematically oversized bears and hyenas!

2013-08-10 10.32.50

2013-08-10 02.22.18

2013-08-10 01.07.51

When I started reading about gladiators, I had no idea that the fighting style were formalized. It wasn’t just two scrappers thrown into a pit with sharp objects. The Retiarius, for example, was a fighting style, a martial art in and of itself. The Retiarius trained in that specific style. And when he fought, it was usually against someone trained and fighting in the Secutor style. It reminds one of sports positions!

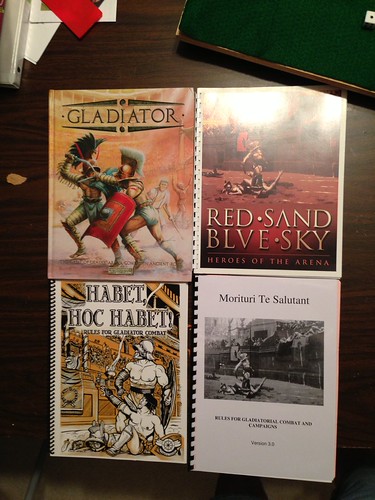
I also have four of the well-known sets of gladiator rules– the unfortunately out of print Warhammer Historical’s Gladiator; Two Hour Wargames’ Red Sun, Blue Sky; Flagship Games’ Habet, Hoc Habet; and Morituri te Salutant.

2013-08-11 23.39.49

Number One Son and I sat down with Red Sand, Blue Sky. My feelings about these rules– as with most Two Hour Wargames– are mixed. On the one hand, they are generally good, fun, and often innovative games. On the other hand, the presentation is distinctly unprofessional. I’m not complaining about layout or lack of color; I mean, the organization of the rules is terrible. I was able to read and play a game of RSBS without too much difficulty, although Number One Son and I scratched our heads about how we could have used beasts in the arena. There are rules for customizing the beasts’ stats, but there are no stats to start with. It appears they were left out, and are available in the errata on the 2HW Yahoo group. Things get missed, and this specific (albeit major) oversight is just symptomatic of a pattern with 2HW that goes back many, many years. Given their reasonable success, I don’t understand why 2HW hasn’t hired a professional editor or at least found a cadre of capable fans to proof read their rules. Anyway, at this point, the pattern is very clear, so at least I knew what I was buying.

Number One Son took a Retiarius, while I ran a Secutor using the programmatic rules. Ideal for solo play, take note! We rolled some customization– while the Secutor was bog standard, while the Retiarius was of a slight build (-1 Strength), but had a Second Wind (recovering not the usual one but two bonus dice, which serve as stamina, when he rested).

The Secutor came out hard and fast, engaging the Retiarius in the middle of the area with aggressive attacks, and giving the Retiarius a minor cut to his head and belly. The Retiarius replied, trying to entangle the Secutor, but was unable to find an opening. Both watched each other in the middle of the arena, recovering their breath, while the Retiarius looked for an opening. The crowd (me) started to boo the lull in the action! Eventually, the Retiarius made a big move and entangled the Secutor, taking him to the sand. Before he could recover, the Retiarius plunged his trident deep in his upper left leg– a potentially mortal wound!

2013-08-11 18.44.55

Given that the match was taking place in the fringes of the Roman Empire, in Numidia, the match was not to the death, and I decided the Secutor would surrender. Things looked bleak– he was Bleeding, so he would lose a Bonus Dice (Stamina) every turn. He was currently Spent (no Bonus Dice), which meant that even resting, at best he could just keep himself from getting any worse. However, any action would cause him to continue to take damage. The Retiarius, though, could recover Bonus Dice and eventually spend them on stronger attacks. Had this been to the death, the Secutor would have been in bad shape indeed!

We both enjoyed the rules. They’re simple, but not too simple. The area is broken up into regions– wall areas on the inside, the heart areas within them, and the center area in, well, the center, the area of prime visibility. If both gladiators are in the same area, they make a Maneuver test to see who will gain the advantage to attack. This is a little different than most war games, but I didn’t have a problem with it.

I had a few criticisms. Primarily, the gladiators in heavier armor didn’t suffer endurance penalties for it, which some people think was an important consideration. Also, there is a mishmash of mechanics– single die roll with bonus to determine move order, buckets of dice for maneuver and combat, and the usual 2HW two dice REP test for other situations. Despite its inelegance, though, it worked well enough. The Non-Player Gladiator (automated opponent) rules were pretty generic and didn’t differentiate between gladiator styles.

But, all in all, we enjoyed it. There’s obviously a lot of room for very detailed combat here. I prefer some simplicity, and felt these gave just about the right amount of complexity. We’ll play a few more times, then start trying some of the other rules. The WH Gladiator book is gorgeous, worth the price just for the pictures alone. Plus, it has a lot more period detail…I imagine it will be next up.

Solo Tabletop Gaming Appreciation Month

April 4, 2011
One is the loneliest number

November ’11 marks the first Solo Tabletop Gaming Appreciation Month. It had its genesis in a thread on the SoloWarGame Yahoo group, and I think it’s a good idea. Solo Wargaming isn’t in the spotlight much anymore but there is still a strong group of enthusiasts. I love the idea, although find the opposition in a solo gaming is often quite boring. 😉 I imagine I’ll do something along these lines for November– however, I won’t be committing to it in May! I have a hard enough time planning my lunch tomorrow, much less a game six months down the road…

Solo Theatre of War Campaign: the Aftermath

November 17, 2010
Map after first battle
Map After First Battle
Originally uploaded by The Gonk

So, what exactly happens to these poor Deutschen Volk after losing this battle? We need to figure out the Battle Points for both the American and the German sides. This is done by a formula using the Army Morale Points (see discussion below) and the Victory Points won during this battle.

Victory Points are only scored for the Objectives held when the battle ended. Obviously, since the poor Germans had NO TROOPS LEFT when the battle ended, they get a big fat goose egg. The Americans, however, held a 10 point hill, a 7 point hill (both on the German right, by American companies that hardly moved from set up), and the hard won 26 point bocage. Left on the table were the 8 point rough hill in the German left flank area, the 8 point crossroads, and the 3 point hill the Shermans left to finish off the last PaK 40 battery.


The Germans started with 18 Army Morale Points, and the Americans with 11. However, I used Piquet’s Field of Battle: WW2. FoB uses a different morale point system than what ToW expects with Point of Attack: Blitzkrieg. ToW and POA:B have been around for ten years, while FoB is relatively new. Some adjustments have to be made. If this were a POA:B game, the traditional Piquet concept of “Morale Chips” would have been generated by draws from the Army Characterization Deck, one draw per three units. So the Americans would have had four draws, and the Germans six. The ACD is basically a poker deck, with the face cards indicating special stratagems in the battle. We’ll ignore that, say the average draw is a 5, and the Americans would have had on the order of 20 chips, and the Germans 30. Looks like the FoB:WW2 AMPs are about half what ToW is expecting, and I will use that rule of thumb.

Giving the Americans an adjusted 22 chips, and the Germans 36 chips, when both ended with 0 chips, that gives us the following:

American Battle Points = (36 – 22) + (0 – 0) + 43 VPs = 56 BPs

German Battle Points = (22 – 36) + (0 – 0) + 0 VPs = -14 BPs

Doesn’t sound very good for the Germans, does it? And they started the campaign with almost half the National Will Points of the Americans. They needed quite a different result.

There are three types of victory in ToW: Marginal, Decisive and Crushing. Since the Americans Battle Points (56) exceed their estimated starting chip count (36), they have won a Crushing Victory. They may 1) move their Battlegroup 1 territory on the campaign map in any direction, 2) 30% of the units in the next battle for this battlegroup will get a unit quality upgrade, and 3) they add the Campaign Point value of the territory (4) to their National Will Points. The American battlegroup stays where they are, since it is a four point territory, and battlegroup I was intended to be their striking force anyway.

The Germans suffer a Crushing Loss. They 1) retreat their battlegroup 2 territories as specified by the Americans, and all other battlegroups one territory of their choice, 2) 30% of the units in this battlegroup will suffer a quality penalty in their next battle, and 3) lose National Will Points according to a table: 30 points for a Crushing Loss + a d10 for having a 3 Strength battlegroup + a d12 for a 4 Value territory– the Germans lose 30 + 6 + 4, or a whopping 40 points! Folks, that leaves the poor Germans with a grand total of 5 National Will Points! Yikes! The Yanks might just be home in time for Independence Day!

Solo Theatre of War Campaign: The Battle of Le Petite Bocageville

November 16, 2010
DSCN0112
The Battle Commences
Originally uploaded by The Gonk

With the forces laid out on the table, I now went ahead and rolled randomly for unit quality. There’s no reason I couldn’t have done it before, although populating stats for fourteen American units and eighteen German units in up to ten different battlegroups is a bit much– better to do it once they are needed. The paratroopers got a veteran bonus and rolled up very nicely, even discounting the temporary hindrance of being out of supply. The Germans had a mix a green, regular and experienced infantry, although in general, they rolled fairly poorly for quality.

DSCN0113

The Shermans perched on their VPs in the rough hill facing serious opposition with two Pz IV companies and two PaK 40 companies. The Greyhounds didn’t even make it that far, cowering out of sight. The Germans must have been convinced there were more Shermans coming, as they were content to keep these two companies out of the battle for a while. In retrospect, I clearly should have advanced the panzers into the paratroopers while I had the chance, and let the PaK 40s keep the Shermans tied up. The chances were slim enough, though, as the Americans advanced faster than the Germans could.

DSCN0114

The grenadiers advanced into the fields quickly, hoping to stake out a good defensive position before the American criminals reach them! The Pz IVs also put a quick hurt on the 57mm guns who raced to the edge of the bocage in an apparently unnecessary attempt to keep the Pz IVs at bay.

DSCN0115

The Germans right was pretty sparse. The paratroopers were sitting on 17 VPs on two hills, but the Germans didn’t have much chance of penetrating that deeply across the open unless things went exceptionally in the bocage.

DSCN0116

The paratroopers endured two rounds of attack from the German 150mm artillery, passing through unscathed and deciding the quickest way to stay that way was to get in the face of the German infantry and take the hurt to them! Which they did, quite effectively.

DSCN0117
DSCN0118

Mein Gott! The fast moving paratroopers are already into the bocage, where it will be harder for the German infantry to spot them with their artillery and the fighting will be largely face to face– something to the Americans’ advantage.

DSCN0119

The Germans start to lose companies on their right flank to extremely accurate and effective long range fire from the Americans.

DSCN0120
DSCN0121
DSCN0122

The ferocity of the paratrooper attack in the fields has forced some of the Germans back, and the relentless Americans maintain the pressure!

DSCN0123
DSCN0124

Late in the morning, the Germans seem to recover from their initial shock at the ferocity of the American attack, and begin to deal casualties of their own…

DSCN0125
DSCN0126

The Shermans are driven behind the hill, but the panzers still don’t advance.

DSCN0127
DSCN0128

…but good ol’ American gumption (and some d12 battalion commanders) keeps the paratroopers fighting, and the entire German left is almost neutralized.

DSCN0129
DSCN0130
DSCN0131

The Panzers finally roll into the American rear, rolling over the shot up 57s. As the PaK 40s engage in a long range duel with the Shermans, the Greyhounds, perhaps having heard one too many “Where is that chickensh*t armor!?” comments over the paratroopers’ radio frequencies, sprint into the mouth of the PaK 40s and deliver some serious damage to one of the batteries.

DSCN0132
DSCN0133

The paratroopers clear out the bocage company by company– not just driving them out, but decimating them entirely. A German rear unit is caught in the open before they could reach the bocage, attack die 12 to defense die 3. 9 strength point loss and an outright kill on the first shot. Scheiße!!

DSCN0134
DSCN0135

The Greyhounds show the Shermans how it’s done, rolling over one of the PaK 40 batteries, while the paratroopers have firm control of the bocage.

DSCN0136
DSCN0137

An American time on target barrage between the regiment’s 75mm guns and the divisions 105mm battery destroys the first panzer company, then, overnight, start destroying infantry companies threatening the bocage. The Americans have taken their share of casualties, though– despite keeping most of their companies in the fight, whereas the Germans are shedding units every turn, both forces are at 0 Army Morale Points. Either unit could break and run, it’s just a matter of whether or not the Gremans can hold out long enough until the Americans decide they must withdraw.

DSCN0138

The night seems to pass quickly, and the German officers are back in the job in the morning, getting their few remaining companies back into the fight while the Americans start to take more casulties.

DSCN0139

The Americans are the first to have to take a Morale test– and they pass! The Germans best hope for victory slips through their grasp…

DSCN0140
DSCN0141

The Americans withdraw to defensive positions and let their effective artillery continue to chew up the German infantry.

DSCN0142

Now it’s the German’s turn…and they pass Morale, too!! Is it possible they will manage to hold out long enough?

DSCN0143

Not in the American artillery has anything to say about it!! The last functional company of the Grenadier regiment is wiped out!

DSCN0144

The panzers are determined to extract their pound of flesh for this terrible battle! They find paratroopers in the open, and descend upon them, guns blazing…

DSCN0146
DSCN0147

…but apparently the paratroopers had their bazookas ready! Once the panzers get in close, they take casualties and are driven back in confusion! The paratroopers fire a destroy the last armor company!

DSCN0148
DSCN0149

American artillery rains down on the remaining PaK 40 battery, and the Shermans finally descend the hill and mop up. In the end, it could have swung the German’s way, but it didn’t. The Americans have decisively defeated this Germany regiment and have won the first battle of the campaign.

Solo Theatre of War Campaign: Eve of First Battle

November 15, 2010
DSCN0103
The Upcoming Battle
Originally uploaded by The Gonk

So now we move from the campaign map to the tabletop. Since both battlegroups used the Attack action, the battle will be a standard Encounter fight, as opposed to something like a Flank Attack vs. Defend. A Retire action would have avoided the fight altogether.

Theatre of War includes rules for setting up the tabletop based on the campaign map and forces involved. The tabletop is divided equally into sixteen sections, in a four by four grid. Cards from the force sequence decks are drawn for the eight grid sections on each side’s half of the table, which gets translated to terrain. Since this battle took place in a Heavy terrain square, with movement cost five, it risked some pretty dense terrain. It wound up with some open areas in the end, though. Here is the battlefiend I drew:

German side

Flank: Heavy Water Feature and Heavy Wood Deploy: Village Deploy: Open Flank: Heavy Hill
Flank: Heavy Water Feature Combat: Impassible Combat: Heavy Wood Flank: Road
Flank: Road Combat: Light Hill Combat: Open Flank: Player’s Choice (Open)
Flank: Road Deploy: Heavy Hill Deploy: Road and Impassible Flank: Heavy Hill and Road

American side

I grabbed various pieces of terrain and laid out the table as described. I opted to make the center “Heavy Wood” bocage fields next to the village. I also need to make some decent river pieces.

Cards were pulled for five American objectives and four German objectives. Each is worth 2-10 points, with nothing other than victory points drawn for them. Each objective is tied to a terrain feature dictated by a Sequence Deck card draw, and with the flanks of the table fairly open, the objectives were concentrated in the center. The bocage is worth a whopping twenty three points, and is right next to an eight point road junction. This looks like it will be the focus of both forces.

Now we need to figure out which actual units will be on the table.  First of all, both forces draw one card from the Army Characterization Deck for each ten units they have on their roster or fraction thereof.  That’s two cards for the Germans with twenty units, and two cards for the Americans with fourteen, only their second card can’t be higher than a four. Both forces played three cards in their battle hand, so that will be three more draws of the Army Characterization deck.  And the Germans get one more draw for having a battlegroup one size larger than the Americans.  Barring some special effects letting you select a specific unit, the units represented are selected randomly.  The Germans got eighteen of their twenty units, choosing a Panzer IV company for certain and randomly leaving two infantry companies out.  The Americans managed to bring their entire fourteen units to this battle.

With the table set up, the objectives all placed, and the army forces selected, they could now be set up. Again, this is accomplished through Sequence Deck draws. Each side draws simultaneously. Depending on the card drawn, a unit is placed on the table in either the Deploy zones, or given the option of the Deploy zone or the Flank zone.  The Action cards in the players’ Battle Hands determines the type of battle played; e.g., in this case, Attack vs. Attack, which in turns determines the layout of the zones on the board.  A Flank Attack would have given me different Deploy zones, for example.

The Americans hit a streak and set up nearly their entire force before the Germans had to make any difficult choices. This left my poor hull down Sherman company anchoring my right flank facing two Panzer IV companies and two PaK 40 batteries!! Right across that wide open stretch of “Player’s Choice” Open terrain, too!  Way to go, HQ.  Hopefully the higher American quality will tell, but the upcoming battle looks rough…

DSCN0104 DSCN0105 DSCN0106 DSCN0107 DSCN0108 DSCN0109 DSCN0110

Solo Theatre of War Campaign

November 14, 2010
The Campaign Map
The Campaign Map
Originally uploaded by The Gonk

I’m finally getting enough WW2 stuff painted to play with. Ideally, I’ll play mostly with my favorite rules system, Piquet. I’ve been reading through the Theatre of War campaign book, and decided to sit down and play a solo campaign using my new troops.

Originally, I started browsing maps around Utah beach, trying to find something that showed enough geography to provide movement info yet not enough writing on it to make it difficult to use. I finally decided I was making it way too hard on myself and just made a random map. This is one row taller than the default map size suggested in ToW. Each map square has a large number in the middle indicating the movement cost to move into that square. Square with cost 6 have a random edge that is impassible. Each square has a smaller number which is the victory points for that square.

One of the interesting things about ToW is that it’s designed to use around your collection, whatever it is. You create a roster of all your units. It works out that I have enough US Airborne painted up to field a parachute regiment reinforced by a couple of companies of armor. With the off-board artillery (the regiment’s 75mm battery, and the division’s 105mm battery), that’s 14 units. The Americans in ’44-45 tend to have better commanders and sequence decks, and are thus the smaller force. Using a little bit of math and the Point of Attack: Blitzkrieg book, ToW tells me I need about half again as many Germans. I scrape together 18 units of Germans which look like a regiment of infantry, the divisional AT battalion, an attached Panzer IV battalion, and the off-board artillery.

Each side may now assemble battlegroups on the map– up to 10 groups with a minimum of one strength point each, or up to four strength points. There may also be three dummy markers. Each battlegroup has an individual command rating, but contains units from this same roster. When the unit is placed on the table for a battle, it gets a random selection of units from that roster based upon not just its size in strength points but also the tactical situation on the campaign map.

Each side also calculates National Will Points– this is basically your will to fight and how you win or lose the campaign. The Americans drew an impress 76 points, while the Germans had a measly 44.

I split the Airborne up into six battlegroups– unit I with strength four, F and H with strength two, and A and D with only strength one. The were set up in the bottom three rows. For the Germans, I threw out six battlegroups. Once I scouted them or got into a battle with them, I would roll to see if they were dummy markers or, if real battlegroups, what their relative strength was.

The campaign is played much like a standard Piquet wargame. Each side has a Sequence Deck tailored to their force which contains cards such as Campaign Movement (Light). Both sides roll for Initiative Points and use those points to draw and play cards from their deck. Unlike most other Piquet games, in ToW, you manage a hand. Since this was early-mid June 1944, or a Summer time period, the hand size was the largest at six cards (versus four for Winter campaigning). In the above example, it would cost one Initiative Point to draw the Campaign Movement card, then one point to play it. Once played, every battlegroup could act on it. Campaign Movement (Light) lets a battlegroup move into a map square with movement cost 1-2 by spending the same amount of Initiative. There are equivalent Medium (3-4) and Heavy (5-6) movement cards.

One opposing battlegroups are in the same map square, one or the other may initiate a tabletop battle by playing an Engage in Battle card. Both sides then assemble a Battle Hand from their current hand of cards. A Battle Hand contains an Actions card, Attack, Defend, Retire and Flank Attack, indicating their tactic for the upcoming battle. If the defend has no Action card in their hand, they default to Defend. The force can bolster their tactical position by playing extra copies of the same Action, or playing Strength cards.

Map with movement
Map with Movement
Originally uploaded by The Gonk

I played through the decks, or one entire turn, without making contact. At some point, I started misreading the map– thinking the movement costs were victory points, I started running the battlegroups of both forces into the bad going! Typical upper echelon foul up!! Despite setting up some temporary supply depots (circled on the map) and having respectably short supply lines, the American group H was caught out of supply. Measuring the shortest path back to the American base of operations (the bottom row square with the asterisk) shows their supply length to be two. To remain in supply once a Supply card is played, he has to roll above that on a d20. He got a two. Since he was out of supply, 10% of his units will be slightly worse quality until he regains supply. He also may not advance.

The Americans played a couple of Scout cards, and determined that that the German battlegroup G was strength three, and battlegroup I was strength four! Clearly, the German schwerpunkt was rolling down the easy mobility center of the map, probably an undamaged road nexus, right between the two thrusts of the Airborne.

Early in the second turn, the Germans showed an Engage in Battle card, along with two Attacks and a Strength. They held onto it until they could throw strength three battlegroup G into the out of supply battlegroup H– only a strength two unit. The odds looked good from the German perspective, but the odds wouldn’t be overwhelming, as the American Battle Hand was an identical two Attacks and one Strength. Attack vs. Attack…the upcoming battle would be an Encounter battle…

Plot Aid Card Deck

December 18, 2008

So, I’ve always been somewhat enamored with solo games and solo campaigns. I do play solo games, especially just in terms of learning new rules or trying out some new figures. Solo campaigns, on the other hand, have seemed rather daunting. This plot aid card deck from Table Top Titans seems like a nice, general tool to prod your imagination along in something like that.